Diagnostic Imaging
Following a consultation for a poorly pet, it may be that we suggest some diagnostic tests to try to confirm or rule out certain conditions. This may include laboratory tests , ancillary tests such as blood pressure readings, and or diagnostic imaging. Certain species that do not show pain or disease in very varied ways are more likely to require diagnostic imaging than others. For example, birds frequently present as lethargic and fluffed up, whatever the cause. Tortoises only leave their legs and heads available for viewing, and hamsters are simply very small. These species – amongst others – may therefore require us to use alternative techniques to palpation alone to work out what is happening.
Similarly, some conditions require imaging to differentiate between them. For example, an abscess deep in the foot can cause just as much pain and swelling as a fractured toe, so a radiograph (x-ray) is required to tell which is which. A painful tummy could be from a problem with the stomach, liver, spleen, pancreas or intestines, so an ultrasound scan may be needed to check these in turn.
What is diagnostic imaging?
Diagnostic imaging is a term used to describe various techniques for viewing the inside of the body. There are several different modalities available, and each has its advantages and disadvantages. In many cases, we may need to employ a mixture of these techniques to try to work out what a particular problem is. Techniques are numerous and varied, but may include radiography (x-rays), ultrasonography, CT scan, MRI scan, and endoscopy. Ophthalmoscopes and otoscopes are also frequently used to view the inside of the eyes and ears, respectively.
It is not always possible to reach a diagnosis using one or a combination of imaging techniques. These help us to narrow down the list of possible causes of your pet’s ailment, but additional tests or surgeries may be required.
Radiography
Most of us are familiar with the concept of x-rays from our own medical experiences, or those of friends or relatives. However, not everyone is so familiar with what they are, or the process of taking and analysing them.
Radiographs use low levels of ionising radiation to highlight different tissue densities within the body. The marker used to signify the left or right side of the patient is always metal, giving us a contrast with the other densities in the body. This allows us to ensure our settings on the machine are correct for the patient – we should be able to distinguish all 5 densities – and to distinguish bone from metal.
The more dense a material is, the more white it will appear on a radiograph. Metal is white, bone is only slightly less white. Soft tissue and fluid are the same density of light grey, and fat is a slightly darker grey. Finally, air is black on a radiograph. By comparing the different densities on an image, we can work out what might be happening.
A radiograph only gives us a 2D picture of a 3D object: everything is compressed into the 2D image. In order to reconstruct a 3D image in our head of what is going on inside the body, we need to take orthogonal views. This means that we need to take at least 2 images of each area we are interested in, at 90 degrees to each other. For example, we could take a picture of an abdomen by taking a radiograph from front-to-back, and from side-to-side through the body. Once we have both 2D images, and we know the anatomy of the body, we can overlay things in our minds to build up a 3D image. In some cases, for example when looking at knee or shoulder joints, we may need to take several angles, to help us to see all aspects of the bones and connections.
Even when we cannot see an actual structure, for example, tendons, the outline or absence of another structure is just as important in determining what is happening. For example, the absence of air in a space where air should be present may suggest that there is fluid or soft tissue present.
Radiography is excellent for getting an overall view of an area, and the comparative shapes and sizes of organs. However, because of the loss of outline of structures when fluid is involved (everything becomes grey), it is not useful for distinguishing different conditions involving fluid production. It can highlight a problem with fluid, or an enlarged organ, but cannot look at the detail inside. In contract to this, air can highlight other structures beautifully, so radiography is the imaging mode of choice in birds. Birds have 9 air sacs and have pneumatic bones, allowing plenty of opportunity to analyse the shapes and sizes of structures beneath and around them.
It is also extremely important that our patients are very still for radiographs, so that this image does not become blurry. As you can imagine most pets simply ignore our polite requests to ‘hold very still’! We therefore frequently need to use a sedative or an anaesthetic to achieve diagnostic quality images.
Ultrasonography
Again, many of us are familiar with ultrasound scans – these are what are used to check pregnancies, as they progress. However, there are many more uses for ultrasonography than pregnancy diagnosis and monitoring.
Ultrasonography is not a painful procedure in most cases, so has the advantage that it can usually be performed in fully conscious patients. Be warned: we cannot scan effectively through hair, so your pet may need to have a rather severe hair cut over a wide area of its body!
This modality is not particularly useful in getting a broad overview of the body, but is excellent for viewing specific things. We can utilise different types of probe shapes, at different frequencies of sound wave emission, to obtain either wedge or block-shaped images of parts of the body at different depths. This allows us to analyse the internal structure of organs such as the liver, kidneys, spleen and intestines, without having to approach surgically. Ultrasound can also be used to guide needle biopsies of various organs, allowing us obtain more targeted information about certain areas without the need for general anaesthesia.
Ultrasound, like radiography, gives us a 2D image of a 3D structure. In the same way that we need orthogonal views for radiography, so do we for ultrasonography. This is achieved by holding the scanner in different directions across the body, giving us different ‘plane’ views. The ultrasonographer will do this as they go along, assessing each organ first in one plane and then in another. For complex organs such as the heart, several different planes are required to assess all of the different valves and areas.
Ultrasound also gives us an image in shades of grey, but the echodensities are almost the opposite of the equivalent radiodensity. For example, air – black on a radiograph – is completely white on ultrasound. This is because ultrasound waves cannot be conducted through air, so bounce back immediately when they hit the air : tissue interface. We therefore cannot scan through air, making ultrasound almost impossible in many birds. Fluid – light grey on a radiograph – is black on an ultrasound scan. Ultrasound waves are transmitted readily through fluid (think of submarines scanning the ocean floor), so fluid is the ideal medium for obtaining excellent images.
Patients with conditions causing fluid build-up, such as blocked bladders, heart failure, liver failure, or those experiencing internal bleeding, are therefore readily and safely analysed via ultrasonography.
Ophthalmoscopic examinations
An ophthalmoscope is a hand-held device that is used to assess various conditions of the eye. For this to work well, the patient should be in a darkened room, so there is a contrast between the surroundings and the bright light of the ophthalmoscope.
The eye is a complex structure made of several components. The cornea is the outermost layer of cells, and is most frequently damaged by scratches. The lens sits behind the pupil and focuses light onto the retina, from where our nerves send impulses to our brains, which translates these into images. The lens is commonly associated with cataracts. The iris is responsible for altering the size of the pupil – allowing us to respond to different intensities of light.
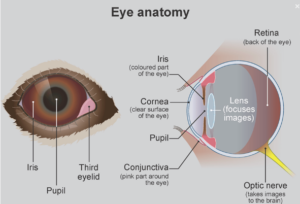
Drawing reference: PDSA website August 2023, with thanks
The ophthalmoscope can be easily used to assess the cornea for any damage, or to look through the anterior chamber for any opacities. However, in order for us to examine the back of the eye – the fundus – we need to be very close to our patients. We are usually nose-to-nose! We can then look at the structure of the retina, which may also assist in diagnosis of patients with high blood pressure. The optic nerve head and the blood vessels around it can be checked for any damage, as can the pectin in birds. Pectin is a beautiful structure only found in birds, but damage to it can lead to permanent blindness. The iris and pupil are then checked, allowing us to detect age-associated changes and structures such as cataracts. The fluid of the posterior and anterior chambers of the eye is also checked for any signs of thickened or foreign material.
Otoscopic examinations
An otoscope is similar to an ophthalmoscope in that it is hand-held, and usually fits onto the same base as an ophthalmoscope does. However, this equipment is used to look into the ear canal.
All species’ ear canals are different, and are designed in relation to their function. For example, rabbits have straight ear canals and large movable pinnae (the outer part of the ear), allowing them to pick up sound from a long way away and process it immediately. Birds have very short ear canals, but they are protected by a static flap of skin, o prevent the ear drum rupturing during flight.
Tortoises have flat ears that pick up vibrations, and are flush with the side of their head. This allows them to pull their ears into the shell with their head, giving full protection.
Dogs and cats have ear canals with a 90 degree bend in them, so that the ear drum cannot be accessed directly from outside. This minimises the chances of grasses and other materials being introduced during hunting and play.
Given the differences between the species, we need to use different shaped heads of the otoscope, and different light intensities, so visualise the ear drums of different animals. To look at the ear drum of a dog or cat, the outside of the ear – the pinna – must be straightened by gentle traction, to reduce the angle of the bend inside. Rabbit ear drums can be readily viewed – providing the otoscope head is introduced into the correct cavity, instead of the blind-ending sac that sits immediately adjacent to the ear canal.
Using an otoscope, we can help to diagnose conditions such as otitis, polyps, ruptured ear drums, foreign bodies within the ear canal, and allergic diseases. Many of these conditions are unfortunately very painful – ear ache is sore for all of us! We cannot always expect our pets to tolerate us pulling an already painful area around, so we may need to sedate your pet to have a good look.
Other useful diagnostic imaging techniques
As a small independent clinic, we are not able to invest in all the equipment we would like to! We therefore sometimes need to refer your pet for further imaging techniques. This could include a CT scan – 3D radiography – to look for conditions such as stick injuries.
We may also suggest an MRI scan to look at the central nervous system (brain and spinal chord), which is difficult to view with other techniques.
Endoscopy can be extremely useful in many of our exotic species as well as in companion pets. A camera is inserted into the body through small holes, allowing us to see what is going on without making large incisions. This is limited to animals large enough to allow a 7mm hole to be comfortably made, so may not be appropriate in all pets.